What Is Exposure Bracketing?
Bracketing can sound like a complicated process but in order to take your real estate photos to the next level. Let check out some idea for your real estate photography in the near future.
This technique is simply a way to ensure you’ve captured a scene with the “best” exposure. For example, if you are taking three photos, you:
- “underexposed”
- “overexposed”
- Take one that reads as the “best” natural exposure
After your photoshoot, you can select which one of your images actually has the ideal exposure for your needs and go from there. You can even go a step further and combine all of the photos with their varying exposures into one image, using Lightroom or Photoshop (more on this later).
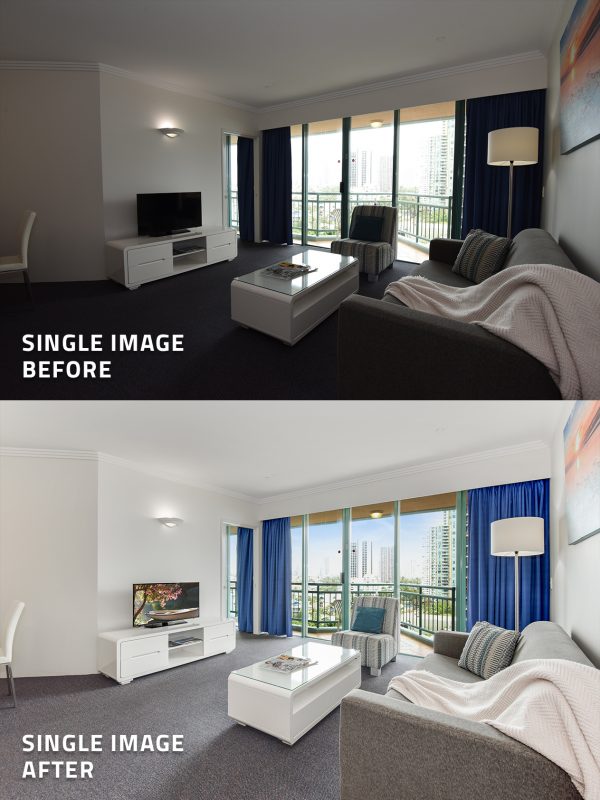
Single Shot Image Example
As you can see from the initial image supplied, the outside detail is lacking quite significantly. This missing information in the single bracket really affects the end product.
Indoor Image Example
- 1st Bracket: From this first bracketed image taken, you can still make out some of the details.
- 2nd Bracket: You can see how there is more detail around the center of the image.
- 3rd Bracket: The third image is our in-between bracket. You can start to see how we are getting more details on the interior whilst the exterior and the glass is blown out.
- 4th Bracket: This bracket you could almost skip as it is similar to the previous, however, it is providing some better detail of the structure and beams which will be useful for filling in any shadows later on.
- 5th Bracket: This is clearly the bracket that is more blown out detail wise. But it is important to include to get a good range of the room in every light and also fill those shadows.
We recommend 5 brackets to submit for the one photo to give Qblends.com the best range of brackets to create one flawless photo. With these 5 well exposed shots, we can create a magazine finish every time.
Outdoor Image Example
- 1st Bracket: The darkest bracket provides good detail of the solar panel and tree foliage. It is a bit dark but is still manageable.
- 2nd Bracket: Next is a slightly lighter shot but you can really make out everything in the image.
- 3rd Bracket: This bracket is a really great shot for getting all the detail in the lawn.
- 4th Bracket: Very similar to the previous bracket but you can obtain more detail of the tree foliage.
- 5th Bracket: The lightest shot of all will fill any shadows we have when combining all 5 images.
With these brackets we layer them like a collage, rub off the parts of the images we don’t need and add in the parts we do.